You (yes probably you!) can build an electric dirtbike that outperforms the Sur-Ron Lightbee for about 3 grand in parts.

If you want to rip backyard trails in the city or just need to shred quietly for whatever reason, but you don’t want to waste a bunch of time and effort building the thing, just skip the rest of this and buy a Sur-Ron (or Talaria or Stark Varg whatever the new hot e-moto is this season). It’s ok, I give you permission.
The Sur-Ron is popular for good reason! It’s fun and relatively cheap.

But it’s also a 3/4 size bike, best for casual riding by teenagers or lighter adults. And if you decide to ride it hard, by the time you’re done replacing the crappy Chinese suspension, hot rodding the drivetrain and swapping proper wheels and tires, you’ll find that you’ve done most of the hard work it would require to roll your own.
If you’re not planning to leave the Sur-Ron stock, you might as well build something yourself starting from a proper chassis.
Honestly, the trickiest part of the whole thing is finding a late model bike with a blown up engine for sale on the cheap. Keep your eyes on Zuckbook, Scamslist and Fleabay for a few weeks, and something will come up. Figure $1000 or so to get yourself a roller. You won’t need the engine, carb, exhaust or gastank, so you might be able to sell things off and recoup some cash to spend on batteries.
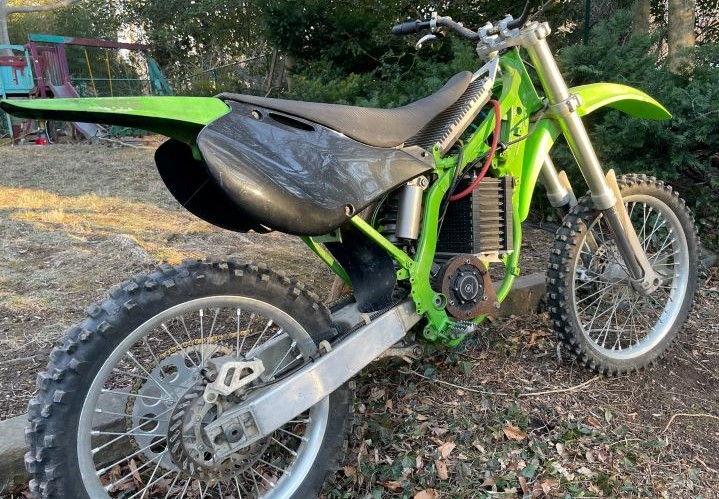
I started with a very clapped out Kawasaki KX125 which has nice adjustable suspension and a grownup-size frame. The only thing to watch out for is bikes with a single frame backbone as they can limit your battery space and make your life more complicated down the road. Most modern motocross bikes have the appropriate “perimeter frame” but many trail bikes do not.
There are dozens of motors available, but the one I chose for my build was a QS Motors QS138 90h V2. If I were doing it again today, I would go with a 70h V3 which can take almost as much power, but has a built in reduction gear so you can use stock rear sprockets. The motor kit included a throttle and Votol EM200 controller, so it was just a matter of hooking up the wires and mounting it to the frame to get it running. You could pick up a controller separately (Fardriver and Nucular seem to be popular right now) and probably find one that’s got more power and a smaller housing, but you may need to spend some time in the setup utility to get it working.
These are mid drive motors, meaning the bolt up in the place where the stock engine was located, and drive the rear wheel with a chain. You can also choose a motor that’s completely contained in the rear hub, but best to avoid these for offroad use. I’m in the process of building a street bike with a hub motor and I’ll report back on how it rides, but you definitely don’t want a 50lb rear wheel if you’re taking your bike off any sweet jumps.
Mounting a mid drive motor requires some careful measurement and bracket cutting to ensure that the sprocket is in the right place. In short, it needs to be lined up with the rear gear, as close to the swingarm pivot as possible, and lined up straight with the swingarm when the suspension is compressed by your weight. You can look at a picture of the donor bike you’re using to get a good sense of stock placement and aim to get as close to that position as clearance will allow.
Then you can either mock up a cardboard bracket to connect the motor to the existing frame mounts and cut it out of metal with a hacksaw, or create a CAD file and send it out to be laser cut. I went with the latter option, using 1/4in steel plate fabbed by a company called Oshcut (mine is way overbuilt). I also needed to modify the rear bracket that came with the motor slightly to fit my swingarm pivot bolt which was a couple of mm larger than whatever bike they designed around.
I also made some spacers to locate it in the correct horizontal position, and for this I used a small lathe, but it could be done with a hand saw or pipe cutter.
Once the motor is fitted, you will be able to measure your available battery space. I went with a fairly crude DIY battery setup made from SPIM08HP cells I purchased from Battery Hookup. These cells evidently came from a defunct Chinese electric bus startup, and their main advantages are extreme cheapness and high current output. I built a 20s1p pack (twenty cells in series for 72 volts nominal) using thick copper strips crimped to the battery terminals to carry the power. I am not running a Battery Management System (the BMS is an electronic device that automatically monitors the battery, has a safety shutoff and balances cells during charging), and instead I have a simple safety fuse and manually balance the battery as needed.

The pack performs fine for my application, and can deliver the 200 amp bursts pulled by my controller without overheating, but the setup does require more attention than an “off the shelf” battery. And since I’m basically only riding this bike around my back yard, I didn’t need much capacity. My setup is only 8 amp hours, which is good for 30min of fun. But most electric enduros will have 30-60ah batteries to support a few hours of riding.
My basic advice if you don’t know your way around high voltage electronics is to just buy a battery pre-made with a BMS and charger. Lithium batteries are serious business, and if abused or mishandled (punctured, shorted, overcharged) can spontaneously combust or electrocute you. No bueno.
There are fairly reputable sellers on Ebay and Alibaba and they can be a good source for a budget build, but there are a number of US companies building high performance packs with known, high quality cells who can set you up for around $1000-1500. This is going to be the most expensive part of the bike, so it’s worth taking the time to figure out what your controller actually can draw and how long you want to be able to ride for in order to size the pack appropriately. 72 volt systems are the most common, but the stock Sur-Ron is 60v and many builders go for 96v. More volts is basically always better from a performance standpoint, but most people consider 96 the max safe voltage for DIY bikes.
Once you have a battery, you’ll need to fab a bit of bracketry to hold it securely in the frame and you’re ready to go.
Just a few notes on power and the riding experience.
First, most electric bikes are single speed, meaning you just twist the throttle and go. No shifting, no clutch. Very simple. However, the power delivery is quite different. Electric motors produce much more torque at low RPMs than gas bikes, so my KX feels frighteningly quick even though it might not have the top end power of it’s original two stroke engine. You can play with gearing and controller settings to adjust the tradeoff between torque and top speed, but you may not get it exactly right the first time out.

You can get a rough sense of how fast your bike will be by looking the motor’s stated max rpm, calculating the reduction, and multiplying by wheel size. My setup goes a bit over 50mph with a fairly large rear sprocket. To determine your peak power output, multiply battery voltage by peak current draw. In other words, my build has 72×200 or 14.4kw, which is comparable to a Honda CRF250f. Other people have pushed this same motor to 30kw (more like a 450), but I would need to upgrade the controller and battery, and frankly I don’t need it where I ride.
For reference, the base model Sur-Ron Lightbee has a 60v 32ah battery, and peak power of 3kw (6kw for the upgraded X model). That’s comparable to to an XR100/125 or similar size bike, and I knew I wanted a bit more than that.
On the other hand, you probably do not need or want more than about 300 amps as the bike will end up being heavy, expensive and nearly unrideable. It is possible to tame the power delivery in the controller settings, and I ended up tuning mine for a bit more top speed (using a feature called field weakening) and a bit less low end snap by limiting the rate at which wheel speed can increase. The stock settings can be a handful on slippery low speed terrain because of the lack of a clutch and the way the rear wheel tends to spin up suddenly if it breaks traction.
While I do miss having a clutch for fine control of power delivery, I very much like the left hand rear brake that replaced it, which makes managing wheelies or steep descents much easier.
Overall I’m happy with this build and am already working on my next electric motorcycle which will have more range and be fully road legal. However, It’s not yet a true replacement for gas my bikes. It’s designed to scratch a very particular itch for me – hot laps around my back yard trails without getting the police called to my house. While you could build a setup that has serious range and will allow rapid charging on the road, it adds a lot of weight and complexity that sort or ruins it as a dirtbike. However, I can see that the batteries are getting smaller, lighter, and cheaper every year, so it may not be long before you can have real all day capability.

If you want to learn more, pop over to the OG forum for DIY electric vehicles at Endless Sphere, or check out the DIY Electric Motorcycle group on Facebook for inspiration and guidance.
Leave a Reply